- today
- label Wet Room Kits
- favorite 0 likes
- remove_red_eye 2587 views

If you're planning to install a wet room shower tray on a concrete floor, you may feel a bit overwhelmed by the prospect. But fear not! With the right preparation and guidance, it's a project that most competent DIYers can tackle.
In this step-by-step guide, we walk you through the process, ensuring that you end up with a beautiful and functional wet room that's perfectly waterproofed.
What You’ll Need
To successfully install a shower tray, you will need the following:
Tools
-
Level
-
Hand saw (if needed)
-
Pencil
-
Measuring tape
-
Chisel and hammer or jackhammer
-
Notched trowel
Materials
-
Shower tray
-
Suitable drain components
-
Floor-levelling compound (if needed)
-
Compression pipe
-
Silicone sealant
-
Tile adhesive
-
Backer boards
-
Waterproofing materials
Preparation
Step 1: Prepare the Area and Supplies
Begin by ensuring the concrete floor area where the shower tray will be installed is clean, level, and free of debris. This includes removing any existing flooring material and ensuring the space is dry. Next, ensure you have ample space to work and gather the supplies needed for the job.
Step 2: Mark the Shower Area
Place the shower tray in the desired location on the concrete floor to visualise the layout. You may need to trim the shower tray with a handsaw to fit perfectly in the space. Use a pencil to mark the perimeter of the shower tray and the location of the drain outlet on the floor.
This helps in planning the drain and pipework placement and will serve as a guide for the area that needs to be chipped away.
Installation Process
Step 3: Chip Away the Concrete
Using a chisel and hammer or a jackhammer (if available), carefully remove the concrete within the marked area to a depth that matches the thickness of your chosen shower tray. This will create a recessed space for the tray to sit flush with the surrounding floor.
Step 4: Prepare the Drain
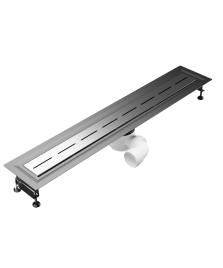
Locate the best possible position for the drain, taking into account the existing pipework and the angle required for proper drainage. Most shower trays come with an adjustable siphon trap that can be rotated and adjusted in height, providing flexibility in drain positioning.
Ensure the trap is adequately supported from below using concrete or a floor-levelling compound if necessary. This will prevent any sagging or movement of the drain over time.
Step 5: Connect the Drain Components
Connect the siphon trap to your existing waste system using a standard compression pipe. When you're confident the trap is well-supported and positioned correctly, use a silicone sealant to fix the pipe to your waste system. To test the drainage, pour some water into the siphon trap and ensure it flows smoothly through the system.
Step 6: Prepare the Base
Clear any dust or debris from the chipped-out area, ensuring the surface is even and free from dust, debris, and moisture. If the concrete is uneven or has many holes, consider using a floor-levelling compound to create a smooth and solid base for the shower tray to sit on.
This ensures stability and prevents future movement. Then, use a spirit level to check that the prepared surface is level.
Step 7: Dry Fit the Shower Tray
Carefully place the shower tray into the recessed area, ensuring it fits snugly and is flush with the surrounding floor. Check that the drain channel aligns with the hole in the base and that the siphon trap can be connected from below. Use a spirit level to verify that the tray is level and that the drain channel is the lowest point in the shower area.
Step 8: Fix the Shower Tray in Place
Apply a thin, even layer of standard tile adhesive over the prepared base using a notched trowel. Carefully lower the shower tray into the adhesive bed, ensuring it is properly aligned and supported. Connect the siphon trap to the drain channel from below, and use silicone sealant to secure the upper part of the siphon trap to the channel.
Step 9: Seal and Waterproof the Tray
If there is a gap between the top of the vertical drain frame and the shower tray surface, use tile backer boards to build up the necessary height and ensure a level surface for tiling. Then, apply a silicone sealant around the edges where the tray meets the walls and floor to create a watertight seal. This will prevent water leakage and ensure the durability of the installation.
Finishing the Wet Room
Step 10: Waterproofing the Rest of the Wet Room
Once you’ve installed the shower tray, ensure the rest of the shower area is watertight by applying a waterproof membrane or coating to the entire area, focusing on the joints between the shower tray and the walls, as well as around the drain.
This membrane will protect the surrounding areas from water damage and is an essential step in creating a fully functional wet room. Once fully dry, you can lay your wet room flooring. The rest of the job involves tiling the walls and adding your chosen enclosures, shower systems, and fixtures.
A Word of Caution
It's important to note that while the general principles apply to most wet room shower trays, you should always follow the specific installation instructions provided by the manufacturer. Each product may have unique requirements, and adhering to them is crucial for a successful installation.
If you need help tackling any part of this project, always consult a qualified plumber, bathroom installer, or shower tray supplier.
Wetroomstop: Laying the Foundations for Installation Success
By following the steps outlined in this guide, you'll be well on your way to enjoying your new wet room. However, successful installation also depends on the quality of your materials and products.
At Wetroomstop, we understand this importance, which is why we specialise in providing premium-quality wet room supplies, including shower trays, drains, tanking kits, and more. Our shower trays are designed with durability and ease of installation in mind and come in multiple sizes and waste positions to suit any space. Specifically designed for concrete subfloors, they provide a stable and robust foundation for your dream wet room.
If you need help choosing the right shower tray or have questions about the installation process, contact our friendly team today for tailored advice.


